
Content
Understanding the Usual Suspects
Knowing your enemy is the first step in effective defense. While countless insects might cross your path, a few are notorious for causing discomfort during summer.Mosquitoes
These persistent pests are attracted by carbon dioxide, body heat, perspiration, and certain scents. They breed in standing water, so areas near ponds, puddles, or even forgotten buckets can be hotspots. Their bites cause itchy bumps, and while mostly just annoying in many regions, they can transmit diseases in some parts of the world.Ticks
Tiny arachnids, not insects, ticks are often found in wooded areas, tall grass, and leaf litter. They don’t fly or jump but wait patiently for a host (like you or your pet) to brush past. Ticks latch on and feed on blood, and certain species can transmit illnesses like Lyme disease. Their bites are often painless, making regular checks crucial.Bees and Wasps
Bees are generally non-aggressive unless provoked or defending their hive. They typically sting once and leave their stinger behind. Wasps, including yellow jackets and hornets, can be more aggressive, especially near their nests or food sources, and can sting multiple times. Both deliver painful stings containing venom.Strategies for Staying Bite and Sting-Free
Prevention is always better than dealing with the aftermath. Incorporating these strategies into your summer routine can make a big difference.Dress for Success (Against Bugs)
Your clothing choices can be a surprisingly effective first line of defense.- Coverage is Key: When venturing into areas known for ticks or mosquitoes (woodlands, tall grass, during dusk), wear long sleeves, long trousers, socks, and closed-toe shoes. Tucking your trousers into your socks provides extra protection against ticks crawling upwards.
- Colour Matters: Light-coloured clothing makes it easier to spot ticks that may have latched on. Some research also suggests that certain colours are less attractive to mosquitoes than darker shades like black or navy blue. While bees are attracted to bright colours, especially floral patterns, wasps might be attracted to bright colours too, so muted, light tones are often the safest bet.
- Fabric Choice: Tightly woven fabrics offer a better barrier against bites than loose knits.
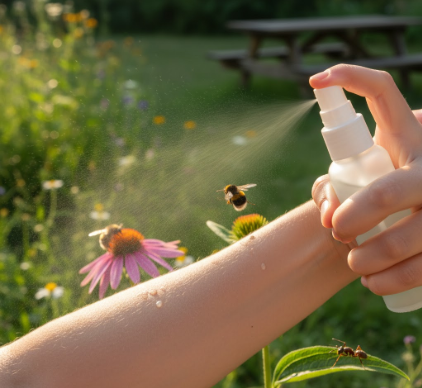
The Power of Repellents
Insect repellents are a vital tool in your anti-bug arsenal. However, it’s essential to use them correctly and choose one appropriate for your needs. Choosing a Repellent: Look for products containing active ingredients proven effective. Common options include DEET, Picaridin, IR3535, and Oil of Lemon Eucalyptus (OLE) or PMD. The concentration matters – higher percentages generally offer longer protection, but aren’t necessarily ‘stronger’ in repelling power. Always select a concentration suitable for the duration you’ll be exposed. Proper Application:- Apply repellent only to exposed skin and/or clothing (check the product label – some can damage certain fabrics or plastics). Do not apply under clothing.
- Use just enough to cover the area lightly; heavy application isn’t more effective.
- Avoid applying to cuts, wounds, or irritated skin.
- When applying to your face, spray it onto your hands first, then rub it onto your face, avoiding eyes and mouth.
- Wash your hands after application.
- Reapply as directed by the product label, especially after swimming or sweating heavily.
- When using sunscreen, apply sunscreen first, let it dry, and then apply repellent.
Important Repellent Safety: Always read and follow the instructions on the repellent label carefully. Keep repellents out of reach of children and assist them with application, avoiding their hands, eyes, and mouth. Not all repellents are suitable for very young children; check age restrictions on the product label before use.Some people prefer natural alternatives like citronella candles or essential oils. While these might offer minimal, short-term protection in a small area, they are generally not considered as effective or long-lasting as registered insect repellents for personal protection, especially in high-risk areas.
Timing and Location Awareness
Sometimes, the best defence is avoiding the peak battle times and locations.- Mosquito Peak Hours: Many mosquito species are most active during dawn and dusk. If possible, limit outdoor activities during these times or be extra vigilant with protection.
- Tick Habitats: Stay towards the centre of trails when hiking and avoid walking through tall grass, brush, and heavily wooded areas unnecessarily.
- Wasp Nests: Be aware of your surroundings. Look out for wasp or hornet nests in eaves, trees, shrubs, or even in the ground. Avoid disturbing them.
Making Your Home and Yard Less Inviting
You can take steps to reduce the insect population right in your own backyard.- Eliminate Standing Water: Mosquitoes need water to breed. Regularly empty water from flowerpots, birdbaths, buckets, gutters, old tyres, and anything else that can collect rainwater. Even small amounts are enough for them to lay eggs.
- Maintain Your Yard: Keep grass mown short and trim shrubs. Remove piles of leaves and brush where ticks like to hide.
- Secure Your Home: Ensure window and door screens are in good repair to keep insects out. Seal cracks or openings where insects might enter.
- Manage Food Sources: Keep rubbish bins tightly sealed. When eating outdoors, keep food covered. Clean up spills and leftover food promptly, as sugary drinks and proteins attract bees and wasps.
- Consider Lighting: Some insects are attracted to standard outdoor lights. Consider using yellow “bug lights,” which are less attractive to many flying insects, though they don’t actively repel them.
Avoid Personal Attractants
Certain things can make you more appealing to biting and stinging insects.- Fragrances: Avoid using strong perfumes, scented soaps, lotions, or hair products when spending time outdoors, especially in areas with lots of bees or wasps. Floral scents can be particularly attractive.
- Food and Drink: Be cautious with open cans of sugary drinks, as wasps and bees can crawl inside unnoticed. Check food and drinks before consuming them outdoors.
Tick Checks: A Crucial Habit
Because tick bites are often painless and some ticks are tiny (nymphs can be the size of a poppy seed), regular checks are essential after spending time in potential tick habitats. How to Check:- Check your entire body, paying close attention to warm, hidden areas: under the arms, in and around the ears, inside the belly button, behind the knees, between the legs, around the waist, and especially in the hair and scalp.
- Use a mirror to check hard-to-see areas or ask someone to help.
- Check your children and pets thoroughly.
- Check your clothing and gear as well – ticks can hitch a ride indoors. Tumble drying clothes on high heat for 10-15 minutes can kill ticks on dry clothing.
Dealing with Bee and Wasp Encounters
Panic is often counterproductive when dealing with bees or wasps.- Stay Calm and Still: If a single bee or wasp is flying around you, try to remain calm and still, or move away slowly. Swatting at it may provoke it to sting.
- Retreat Slowly: If you encounter multiple aggressive insects or disturb a nest, retreat slowly and deliberately. Protect your face as you move away. Do not flail or run wildly unless absolutely necessary.
- Check for Stingers (Bees): If stung by a bee, the stinger is often left behind. Remove it quickly by scraping it sideways with a fingernail or a credit card edge. Avoid squeezing the stinger with tweezers, as this can inject more venom. Wasps do not leave stingers behind.
Basic Care for Bites and Stings
For most common, uncomplicated bites and stings, simple care can help manage discomfort. Wash the affected area gently with soap and water. Apply a cold compress or ice pack (wrapped in a thin cloth) for 10-15 minutes at a time to reduce pain and swelling. Try not to scratch bites, as this can break the skin and lead to infection. Over-the-counter hydrocortisone creams or calamine lotion might help relieve itching for some individuals, while oral antihistamines could reduce itching and swelling (always follow product directions).Verified Information: Promptly removing ticks significantly reduces the risk of acquiring tick-borne illnesses, as transmission often requires the tick to be attached for a specific duration, typically hours. Washing the bite area after removing a tick is a recommended hygiene practice. Regularly checking yourself, children, and pets after outdoor activities in tick-prone areas is a key preventative measure.It’s important to remember that this advice is for minor reactions. Severe reactions, such as difficulty breathing, swelling of the face or throat, dizziness, or hives spreading rapidly, require immediate medical attention.


